SKU: OT6745 Numéro d’article: XV193 EAN: 8720828223635

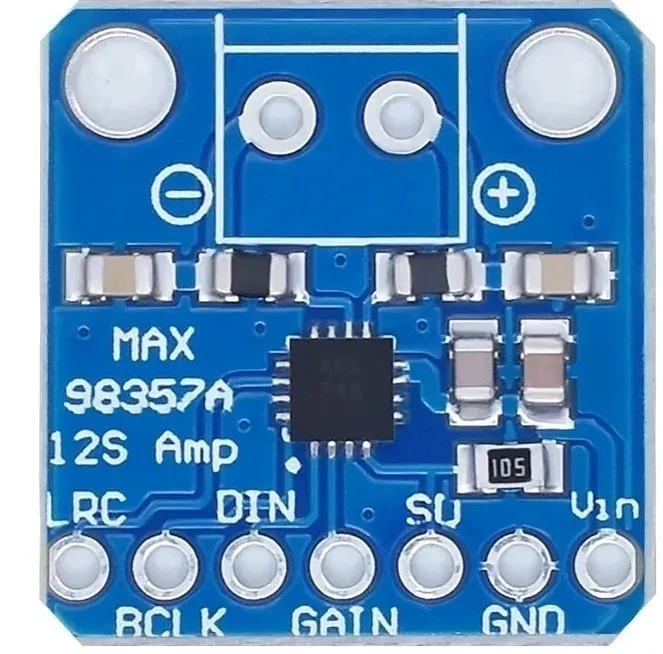
Si vous cherchez un moyen simple et abordable d’amplifier vos fichiers audio numériques, le MAX98357 I2S Amp Breakout est fait pour vous. Il prend en entrée l’audio numérique I2S standard et le convertit non seulement en analogique, mais l’amplifie aussi directement vers un haut-parleur. Parfait pour ajouter un son amplifié compact, il combine 2 breakouts (DAC I2S + ampli) en un seul.
L’I2S est un protocole audio numérique utilisé sur les cartes de développement pour transmettre des données audio. De nombreuses puces et processeurs avancés gèrent tout l’audio au format numérique I2S. Pour entrer ou sortir des données, trois ou quatre broches sont utilisées (entrée de données, sortie de données, horloge bit et sélection du canal gauche-droite). En général, pour les appareils audio, il y a une puce DAC qui prend en charge l’I2S et le convertit en signal analogique pouvant piloter un casque.
Ce petit amplificateur mono est étonnamment puissant - il peut fournir 3.2 watts à un haut-parleur d’une impédance de 4 ohms (avec une alimentation de 5V et 10% THD). La puce miniature intègre un contrôleur de classe D, fonctionnant avec une tension d’alimentation de 2.7V-5.5VDC. Comme l’amplificateur est de classe D, il est extrêmement efficace, ce qui le rend parfait pour les projets portables et alimentés par batterie. Il dispose d’une protection thermique et contre les surintensités intégrée, mais nous avons à peine remarqué qu’il chauffait.
L’entrée audio est au standard I2S, vous pouvez utiliser des données logiques 3.3V ou 5V. Les sorties sont en mode "Bridge Tied" - cela signifie qu’elles sont connectées directement aux sorties, sans connexion à la masse. La sortie est un signal PWM en onde carrée d’environ ~300KHz qui est ensuite "moyenné" par la bobine du haut-parleur - les hautes fréquences ne sont pas entendues. Tout ce qui précède signifie que vous ne pouvez pas connecter la sortie à un autre amplificateur, elle doit piloter directement les haut-parleurs.
Il existe une broche Gain qui peut être ajustée pour modifier le gain. Par défaut, l’amplificateur vous donne un gain de 9 dB. En connectant une résistance de pull-up ou de pull-down, ou en câblant directement, la broche Gain peut être réglée sur 3 dB, 6 dB, 9 dB, 12 dB ou 15 dB.
La broche ShutDown/Mode peut être utilisée pour mettre la puce en veille ou pour définir quel canal audio I2S est envoyé au haut-parleur. Par défaut, l’amplificateur fournit un mix stéréo (L+R)/2 en sortie mono. En ajoutant une résistance, vous pouvez le modifier pour sortir uniquement le canal gauche ou uniquement le canal droit.
Spécifications :
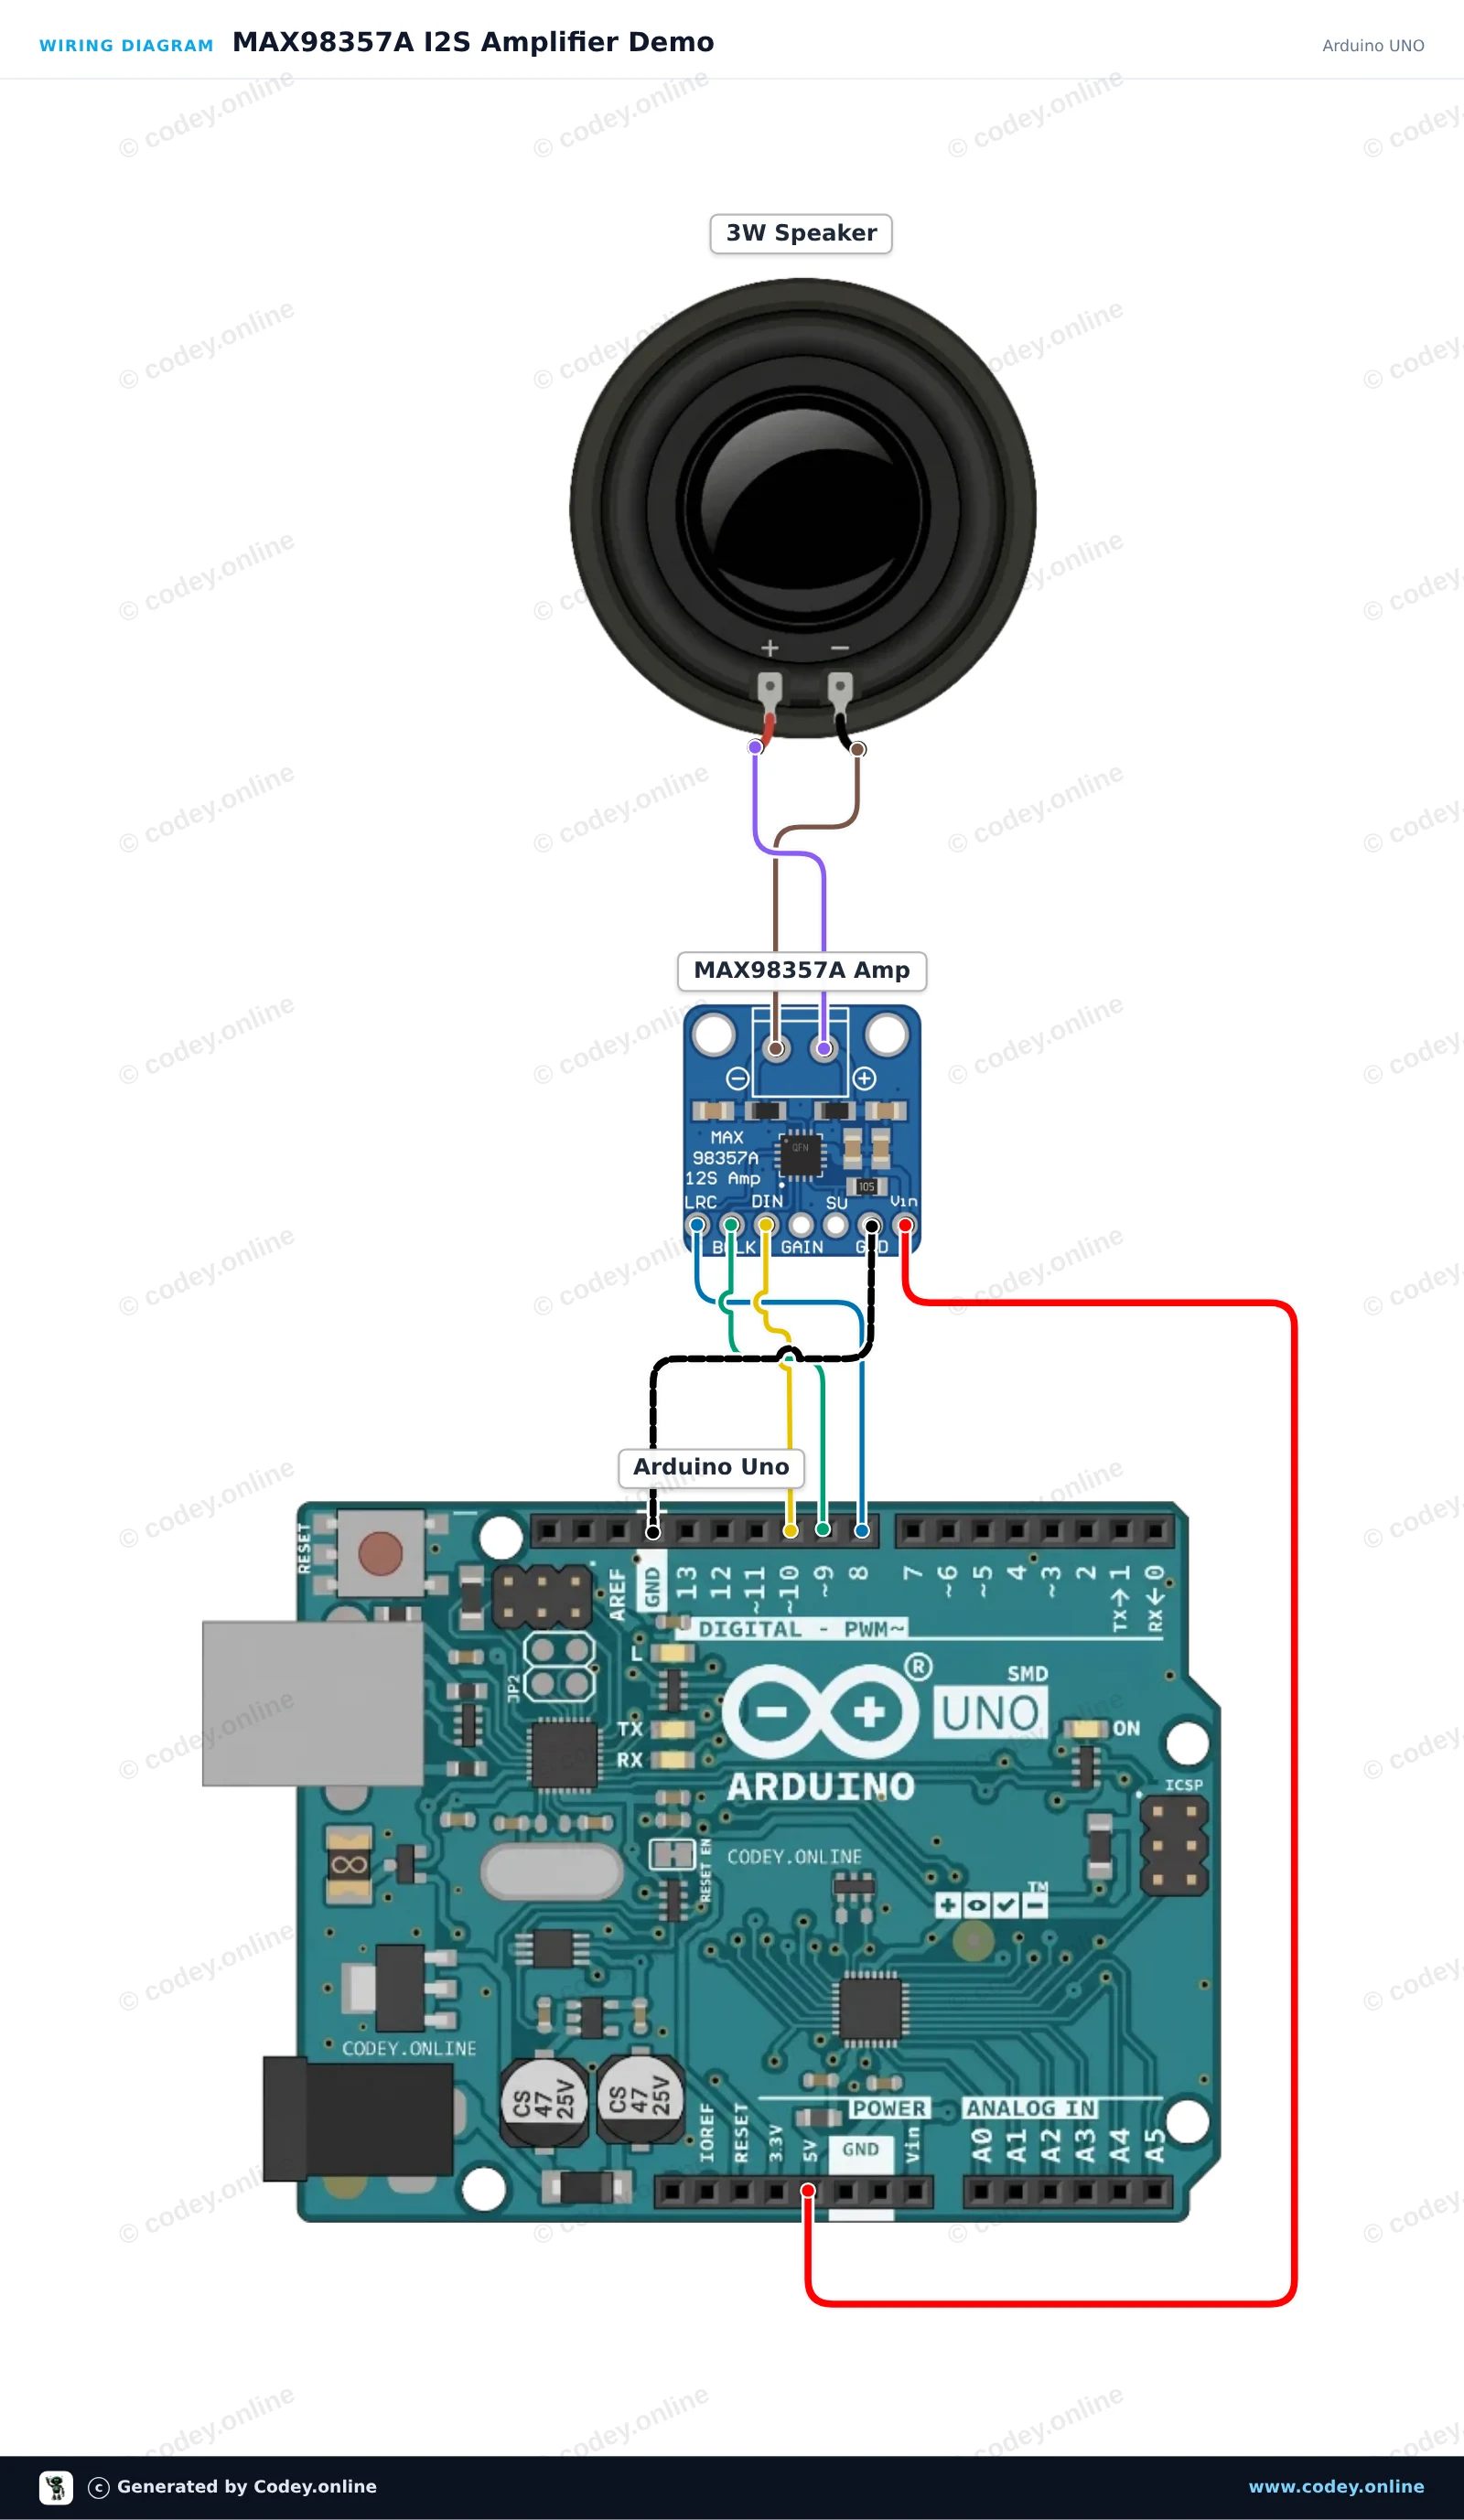
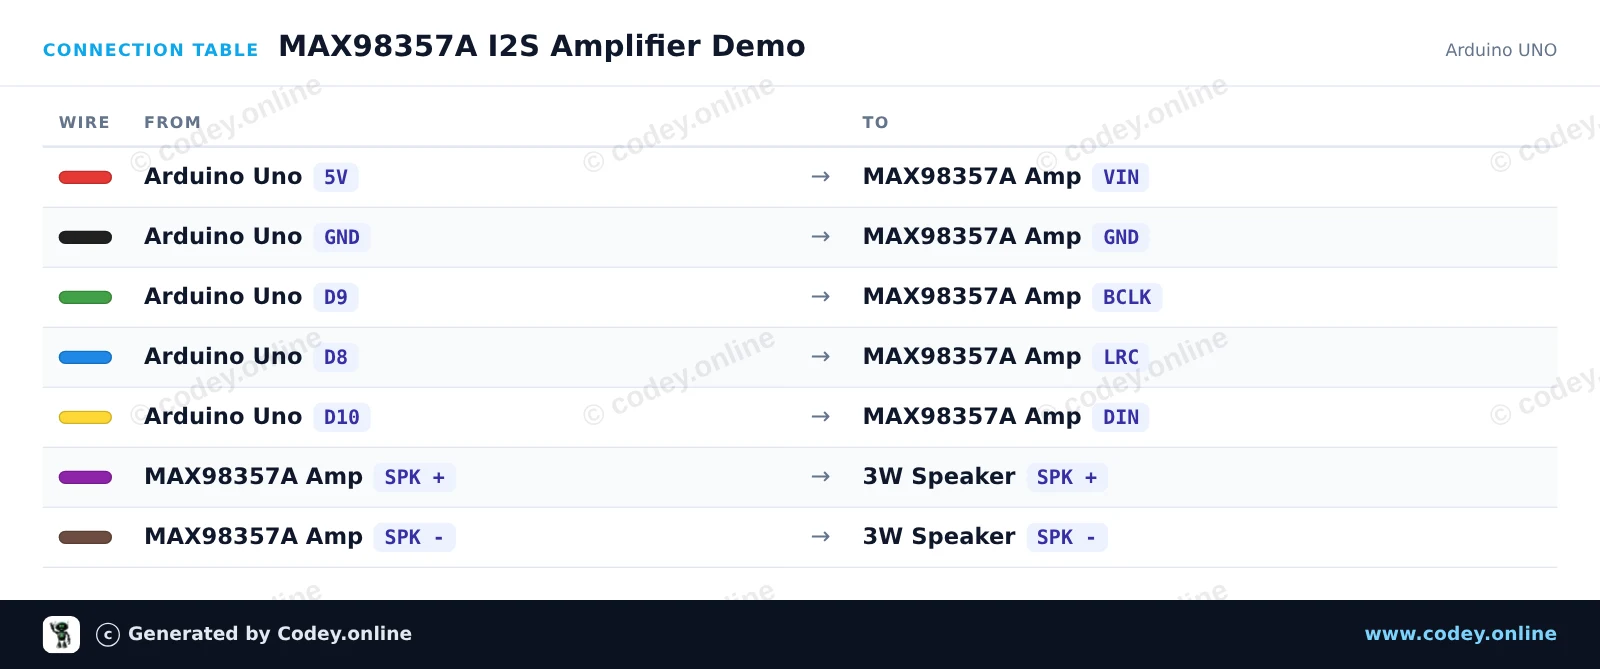
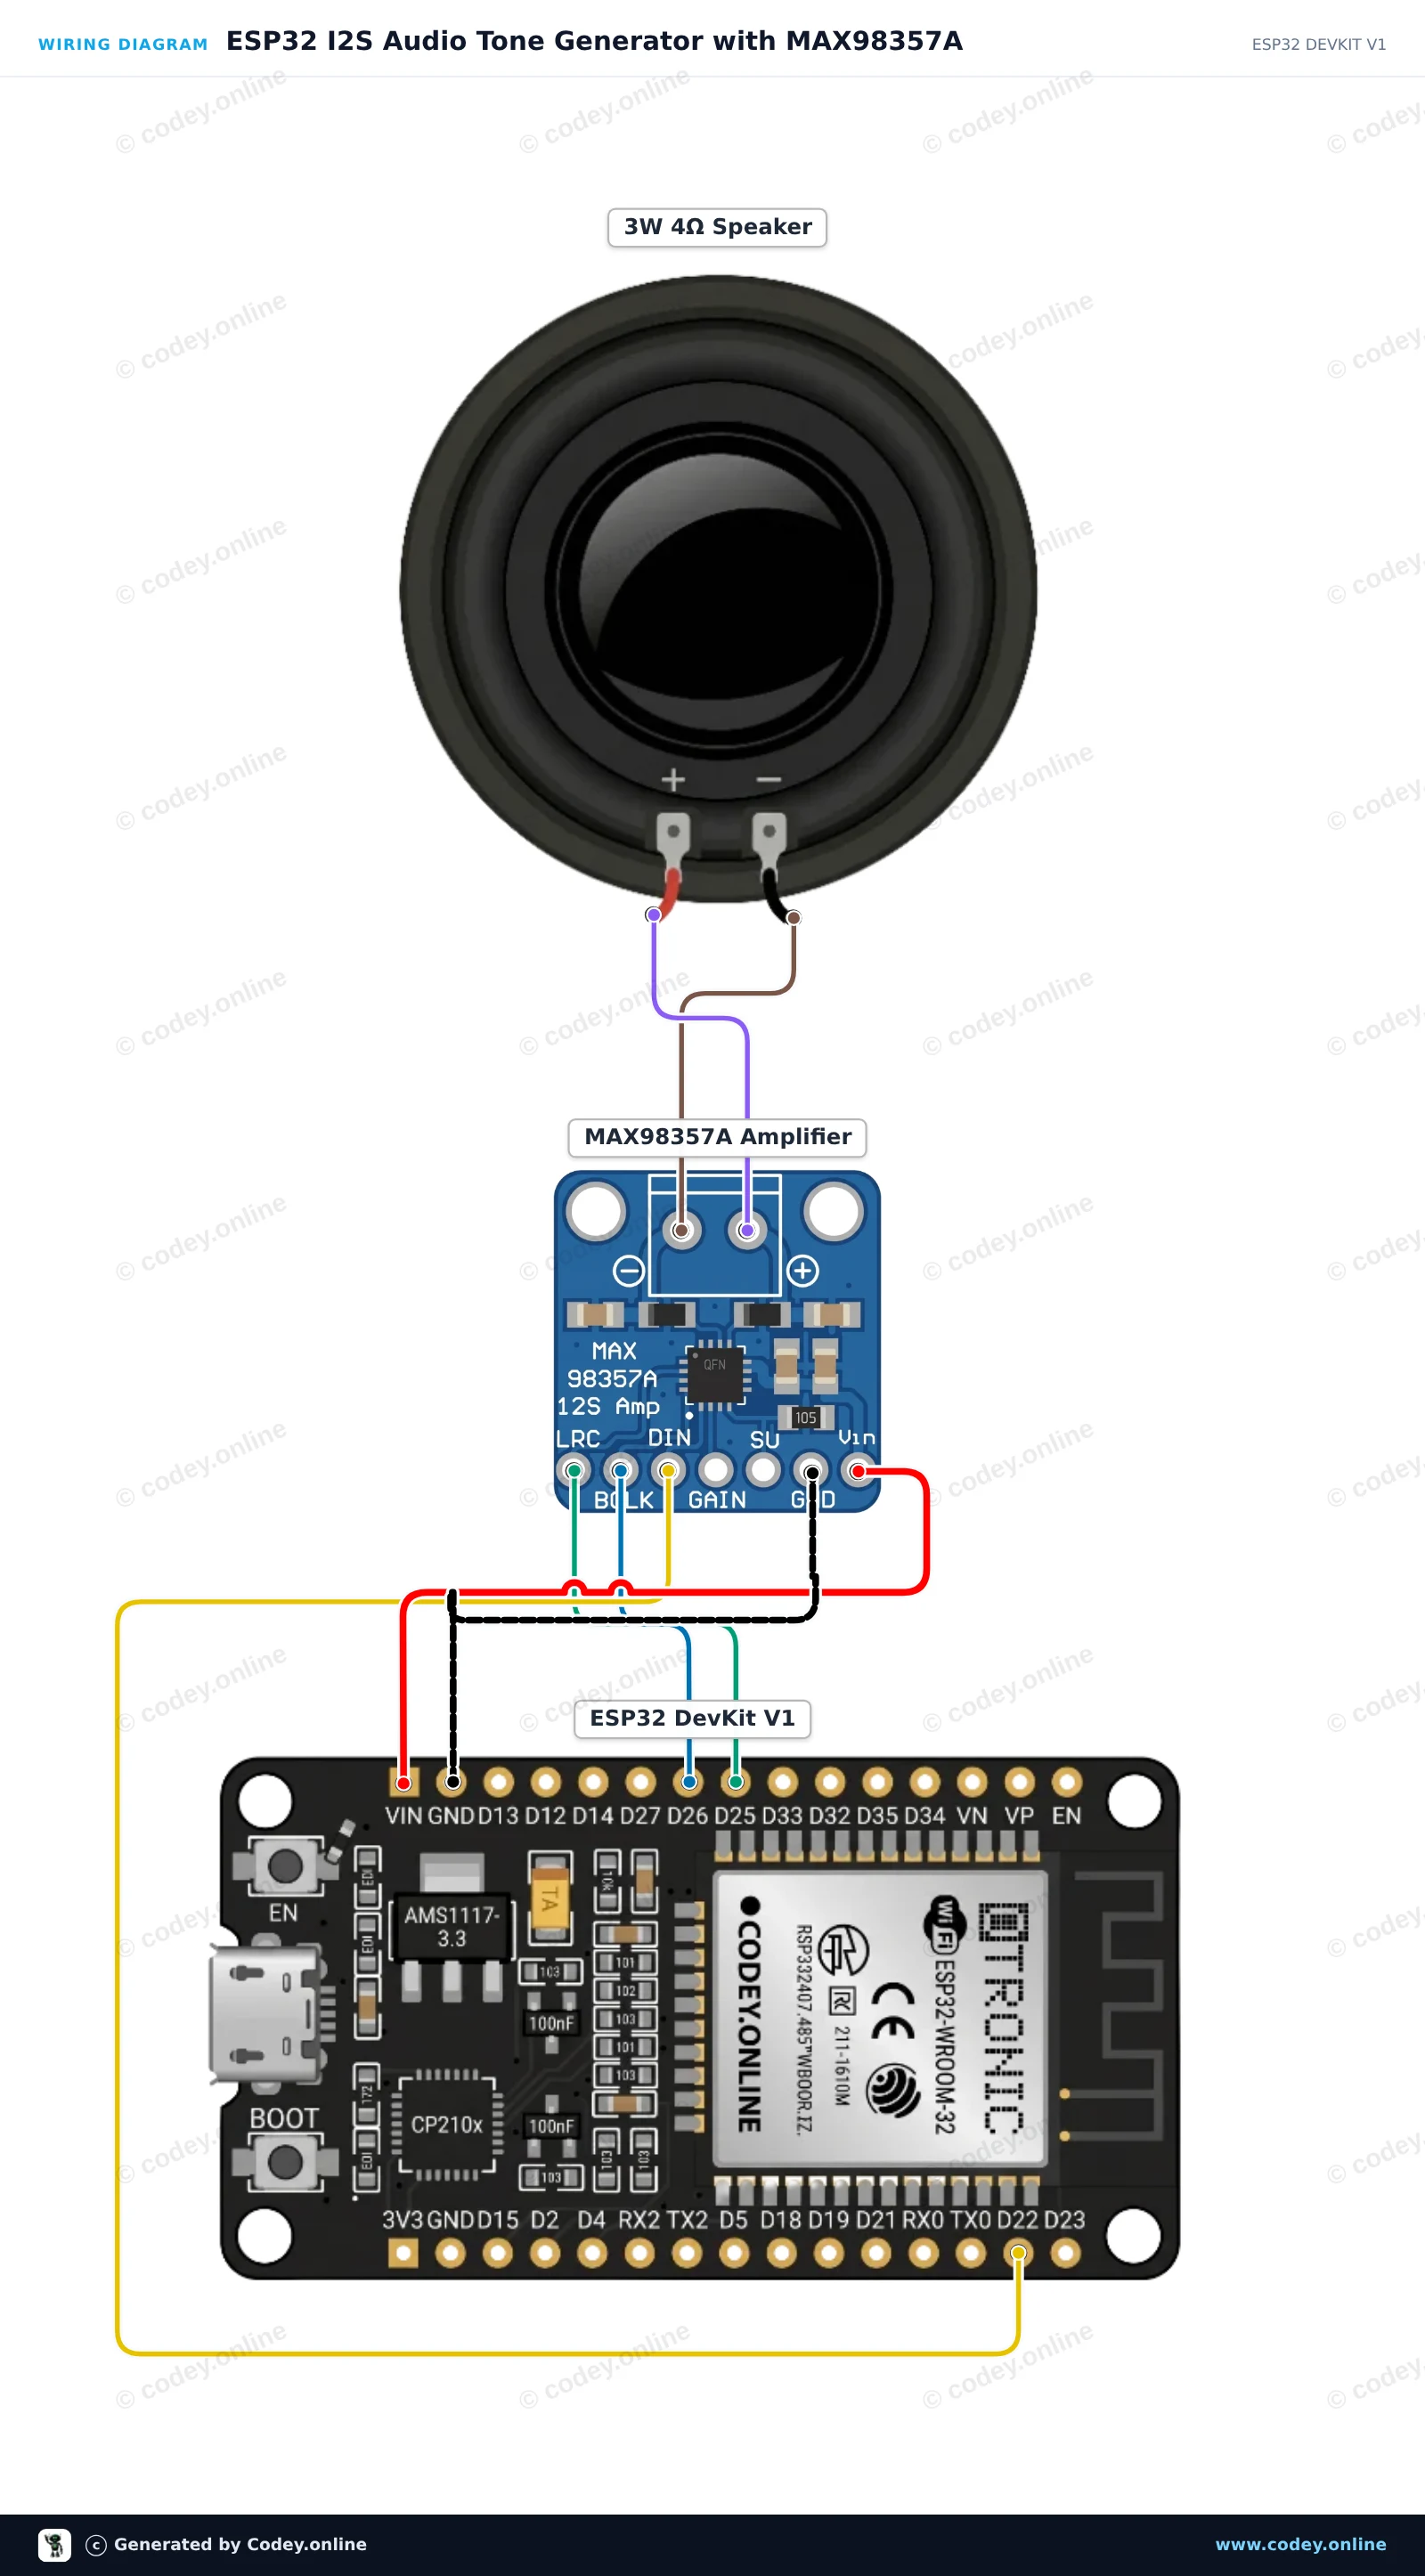
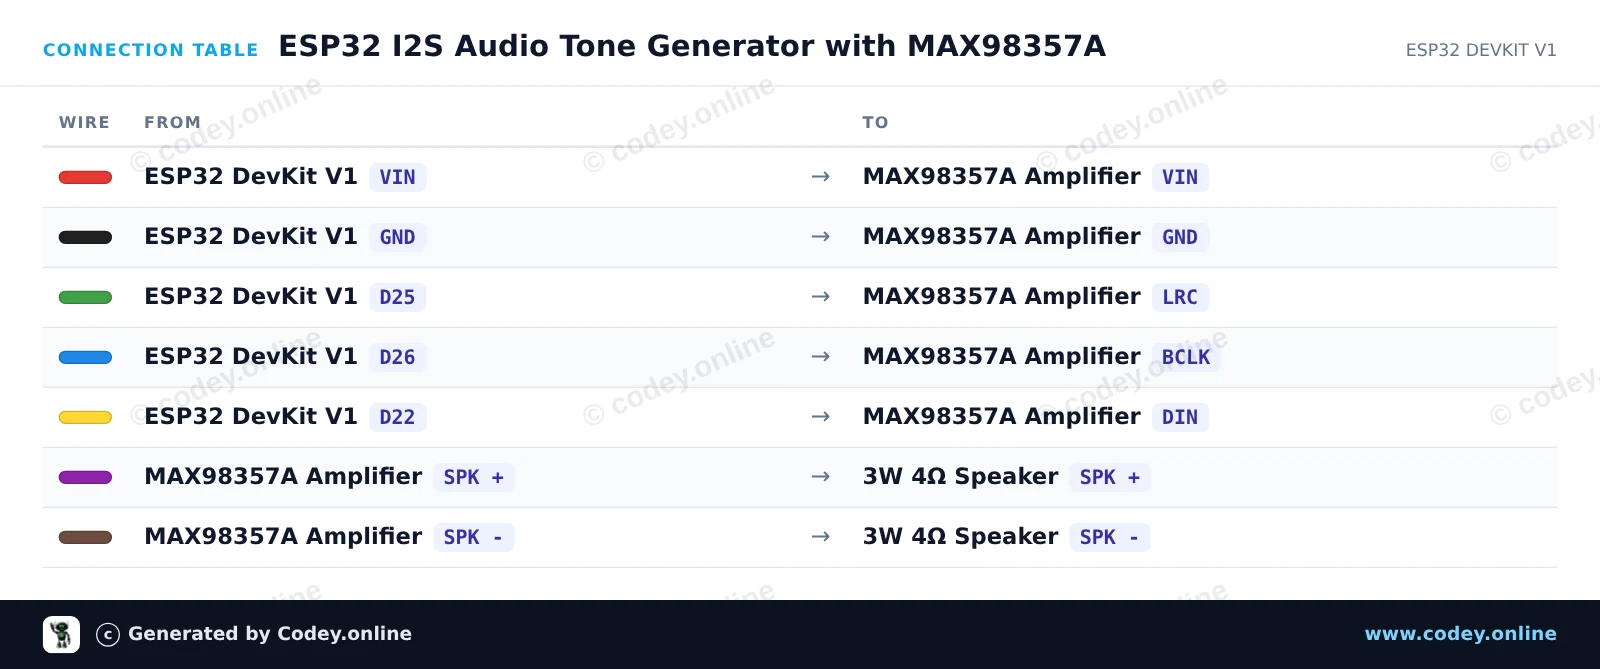
Voici comment connecter le DAC I2S avec amplificateur 3 W - MAX98357A à un Arduino UNO ou à un ESP32, avec un exemple de sketch que tu peux téléverser directement.
Ce projet présente l'amplificateur I2S MAX98357A connecté à une Arduino Uno et à un haut-parleur de 3W. Comme l'Arduino Uno basé sur AVR ne dispose pas de périphérique I2S natif, le sketch montre le câblage de l'interface en basculant les broches de contrôle et de données et en affichant des messages d'état dans le Serial Monitor à 115200 baud.
/*
 * ==================================================================
 *  Generated by Codey.online  —  https://www.codey.online
 * ==================================================================
 *  Project   : MAX98357A I2S Amplifier Demo
 *  Board     : Arduino UNO (arduino:avr:uno)
 *  Parts     : 3W amplifier MAX98357A I2S DAC
 *  Libraries : none (built-in)
 *
 *  Codey Online is an AI-powered browser IDE for Arduino and ESP32.
 *  Describe your project and Codey writes the code, draws the wiring
 *  diagram and uploads it to your board, straight from the browser.
 *  This code is free to use, modify and share, without warranty.
 * ==================================================================
 */

// MAX98357A I2S Amplifier wiring and basic test sketch
// Note: AVR Arduino Uno does not have hardware I2S.
// This sketch verifies pin connections and demonstrates signal pulsing.

const uint8_t PIN_BCLK = 9;
const uint8_t PIN_LRC  = 8;
const uint8_t PIN_DIN  = 10;

const unsigned int toneHz = 440;
const unsigned long toneOnMs = 1000;
const unsigned long toneOffMs = 500;

void outputPulse(unsigned long durationMs, unsigned int frequencyHz) {
  unsigned long start = millis();
  unsigned long halfPeriodUs = 500000UL / frequencyHz;

  while (millis() - start < durationMs) {
    digitalWrite(PIN_DIN, HIGH);
    delayMicroseconds(halfPeriodUs);
    digitalWrite(PIN_DIN, LOW);
    delayMicroseconds(halfPeriodUs);
  }
}

void setup() {
  pinMode(PIN_BCLK, OUTPUT);
  pinMode(PIN_LRC, OUTPUT);
  pinMode(PIN_DIN, OUTPUT);

  digitalWrite(PIN_BCLK, LOW);
  digitalWrite(PIN_LRC, LOW);
  digitalWrite(PIN_DIN, LOW);

  Serial.begin(115200);
  Serial.println(F("MAX98357A Amplifier Test"));
  Serial.println(F("Pins initialized: BCLK=9, LRC=8, DIN=10"));
}

void loop() {
  Serial.println(F("Signal ON (440 Hz pulse)"));
  outputPulse(toneOnMs, toneHz);

  Serial.println(F("Signal OFF"));
  digitalWrite(PIN_DIN, LOW);
  delay(toneOffMs);
}Wiring diagram and example code generated by Codey.online — https://www.codey.online
Ce projet diffuse des tonalités audio alternées via un haut-parleur de 3W à l’aide de l’amplificateur audio numérique I2S MAX98357A. L’ESP32 synthétise en temps réel de l’audio PCM 16-bit et le transmet directement au DAC amplificateur via le bus I2S.
/*
 * ==================================================================
 *  Generated by Codey.online  —  https://www.codey.online
 * ==================================================================
 *  Project   : ESP32 I2S Audio Tone Generator with MAX98357A
 *  Board     : ESP32 DEVKIT V1 (esp32:esp32:esp32doit-devkit-v1)
 *  Parts     : 3W amplifier MAX98357A I2S DAC
 *  Libraries : none (built-in)
 *
 *  Codey Online is an AI-powered browser IDE for Arduino and ESP32.
 *  Describe your project and Codey writes the code, draws the wiring
 *  diagram and uploads it to your board, straight from the browser.
 *  This code is free to use, modify and share, without warranty.
 * ==================================================================
 */

#include <Arduino.h>
#include "driver/i2s.h"
#include <math.h>

#define I2S_BCLK 26
#define I2S_LRC  25
#define I2S_DIN  22

#define SAMPLE_RATE 44100

void setup() {
  Serial.begin(115200);

  i2s_config_t i2s_config = {
    .mode = (i2s_mode_t)(I2S_MODE_MASTER | I2S_MODE_TX),
    .sample_rate = SAMPLE_RATE,
    .bits_per_sample = I2S_BITS_PER_SAMPLE_16BIT,
    .channel_format = I2S_CHANNEL_FMT_RIGHT_LEFT,
    .communication_format = I2S_COMM_FORMAT_STAND_I2S,
    .intr_alloc_flags = ESP_INTR_FLAG_LEVEL1,
    .dma_buf_count = 8,
    .dma_buf_len = 64,
    .use_apll = false,
    .tx_desc_auto_clear = true
  };

  i2s_pin_config_t pin_config = {
    .bck_io_num = I2S_BCLK,
    .ws_io_num = I2S_LRC,
    .data_out_num = I2S_DIN,
    .data_in_num = I2S_PIN_NO_CHANGE
  };

  i2s_driver_install(I2S_NUM_0, &i2s_config, 0, NULL);
  i2s_set_pin(I2S_NUM_0, &pin_config);

  Serial.println("MAX98357A I2S Tone Generator Ready!");
}

void playTone(float freq, int durationMs) {
  int totalSamples = (SAMPLE_RATE * durationMs) / 1000;
  size_t bytesWritten;
  int16_t buffer[128];

  float phaseStep = 2.0 * PI * freq / SAMPLE_RATE;
  float phase = 0.0;

  int samplesRemaining = totalSamples;
  while (samplesRemaining > 0) {
    int toWrite = min(64, samplesRemaining);
    for (int i = 0; i < toWrite; i++) {
      int16_t sample = (int16_t)(sin(phase) * 6000.0);
      buffer[i * 2] = sample;     // Left channel
      buffer[i * 2 + 1] = sample; // Right channel
      phase += phaseStep;
      if (phase >= 2.0 * PI) phase -= 2.0 * PI;
    }
    i2s_write(I2S_NUM_0, buffer, toWrite * sizeof(int16_t) * 2, &bytesWritten, portMAX_DELAY);
    samplesRemaining -= toWrite;
  }
}

void loop() {
  Serial.println("Playing 440 Hz (A4)...");
  playTone(440.0, 400);
  delay(100);

  Serial.println("Playing 880 Hz (A5)...");
  playTone(880.0, 400);
  delay(1000);
}Wiring diagram and example code generated by Codey.online — https://www.codey.online






 English
  Nederlands
  Deutsch
  Italiano
  Español
  Suomi
Suomi  Polski
  Dansk
Dansk  Ελληνικά
  Български
  Čeština
  Hrvatski
  Aileen